How to Set Up an Imaging Room Layout for Efficiency
Send inquiry now
The layout of a hospital’s imaging department sets the stage for how smoothly everything runs. Successful hospital imaging design isn’t just about where you place the imaging equipment — it shapes the whole experience, from scheduling to diagnosis. When patients are spared from long walks across the facility and extended waiting times, they feel less stressed, and the entire visit feels a bit easier.
For staff, smart design is critical for an efficient medical imaging workflow. Grouping preparation, scanning, and reading areas logically allows staff to complete their works smoothly and safely. Keeping clean and contaminated areas distinctly separate can protect both patients and staff from cross-infection.
Putting these designs all together, the benefits are clear. Patients spend less time waiting for scans and results, while staff work more smoothly and confidently. Additionally, the facility makes better use of space, staff, equipment and supplies, which leads to significant savings.
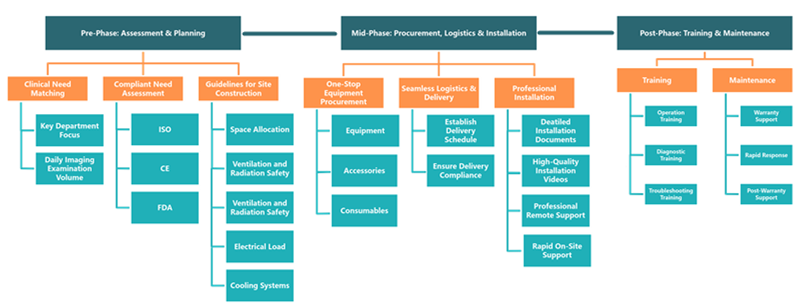
Designing an imaging room isn’t simple. It’s got everything from strict safety rules to complex technology, and if any of those things go wrong, it’s easy for the whole plan to get messed up. Many hospitals are now choosing a one-stop imaging solution to manage this. It cover everything — from initial layout to final setup. This prevents coordination gaps and ensures the project meets all standards from day one.
Key Considerations for an Efficient Imaging Room Layout
To translate these principles into a practical layout, the design process should focus on four key factors. The following considerations lay the foundation for an imaging department that prioritizes safety, efficiency, and patient-centered care.
1. Patient and Staff Safety
Safety should be the top priority when designing an imaging room layout. A properly structured space protects both patients and staff while ensuring compliance with regulatory standards. Focus on these three key safety components:
① Emergency Exit Planning
A good imaging room needs emergency exits that are easy to spot. This means ensuring pathways are always clear, exit signs are highly visible, and doors are easily operable.
- Unobstructed Pathways: Keep all doorways and hallways clear — no equipment or cables in the way, ever.
- Visible Signage: Make sure exit signs are lit up and easy to see, even when the room is dark for scans.
- Easy accessibility: Doors should open without any fuss, and allow patients in wheelchairs or on stretchers to get out quickly if something goes wrong.
② Safety Equipment Placement
Outfitting the imaging room with the right safety gear keeps people safe and lets staff react fast when something goes wrong. Keep fire extinguishers somewhere easy to spot and grab, and make sure they follow local fire codes. Use smoke detectors made for healthcare or imaging settings, so staff get a heads-up if there’s trouble. And don’t forget emergency lighting — backups should kick in right away if the power cuts out, helping everyone get out safely.
③ Radiation & Magnetic Shielding
Imaging rooms — especially those with X-ray, CT, or MRI machines — need serious shielding to keep everyone safe.
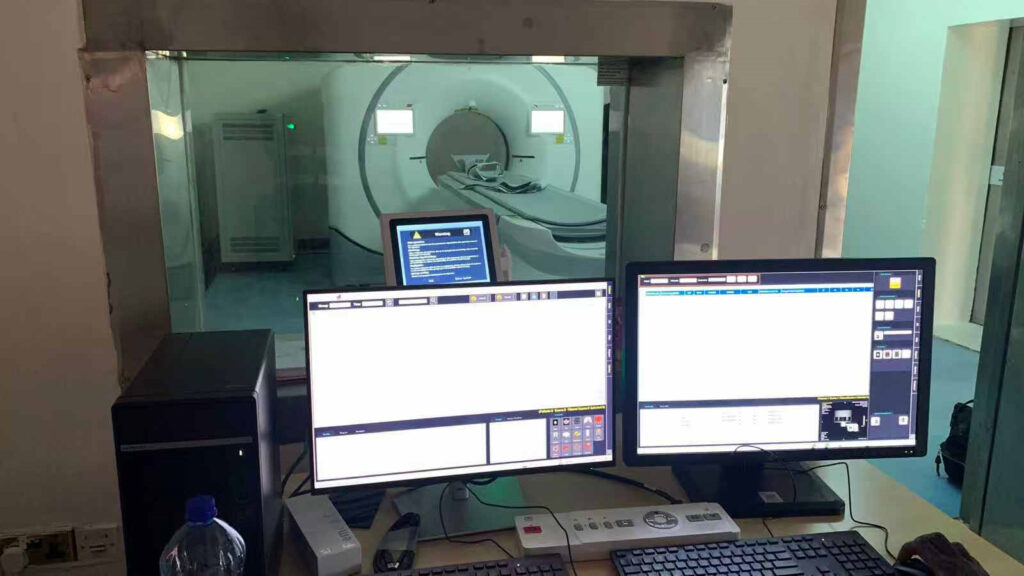
- Radiation Shielding: DR and CT rooms are designed as self-contained units to prevent radiation exposure. The wall should be built tough, with solid brick plus a layer of lead sheeting. Doors and windows aren’t left out — they get lead glass and lead-lined doors, all hitting the strict safety standards. Each scan room connects to its own control room, separated by a viewing window. This way, staff can run the machines and keep an eye on patients without any risk of radiation exposure.
- Magnetic Shielding: MRI rooms are a different story. Everything, from the tiles to the window frames, has to be non-magnetic. The entrance has big warning signs and a metal detector so nothing dangerous sneaks in. The whole setup splits into a “non-magnetic” scan room and a control room, with a lead door in between. Even the computers and wiring in the control room come specially shielded, just so they don’t mess with the sensitive MRI equipment.
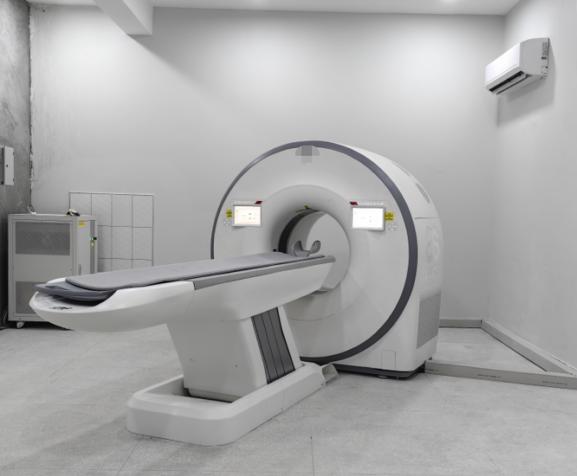
2. Equipment Placement
The equipment layout is designed around three core principles to maximize both efficiency and safety.
① Easy Patient Access
The scanner sits right in front of the entrance, out in the open — not hidden away in a corner or behind a maze of equipment. Patients, even those on gurneys or in wheelchairs, have a short, clear path straight to it. Nothing blocks the way.
② Optimized Medical Imaging Workflow
The operator’s console is close — just a meter or three from the scanner — and there’s nothing in the way, so staff see patients clearly and adjust settings without leaving their spot. It just makes everything run faster.
③ Space for Operations and Maintenance
Adequate space is reserved around the equipment to comfortably support daily clinical tasks and ensure straightforward access for maintenance and servicing.
3. Patient Comfort
If patients feel comfortable, they’re much more likely to cooperate. In imaging, a relaxed person usually stays still, which means the pictures come out clearer and technologist don’t have to retake them.
① Comfortable Waiting Area
The waiting area should feel comfortable and relaxing. Think cozy chairs, or some magazines or books to flip through. Keep the area close enough to the imaging rooms so patients don’t have to walk far, but not so close that they hear machines buzzing and clanking. A comfortable setting really helps patients take the edge off stress before the scan starts.
② Seating & Positioning
Now, for the scan itself. Some tests, like MRI or CT scans, can take a while. If someone has to lie still for a long stretch, make sure the table is easy to adjust and has proper supports for the head, neck, and limbs. Small touches like pillows or extra padding go a long way — they make those long sessions much easier to get through.
③ Temperature Control
Nobody wants to freeze or overheat during a scan. Keep the room at a steady, comfortable temperature — usually somewhere between 20 and 24°C. This doesn’t just help the machines work properly; it keeps patients comfortable, especially if they’re wearing a gown. A comfortable
4. Incorporate Technology for Efficiency
Technology has really changed the game in modern hospital imaging design, particularly for the medical imaging workflow. When you bring everything together — imaging, patient records, reporting — suddenly the whole process runs smoother and there’s less room for mistakes.
① Picture Archiving and Communication System (PACS)
PACS allows to store and pull up medical images digitally. With PACS in place, technicians can quickly access previous images and data. That means they work faster and get things right more often.
② Electronic health records (EHR)
Linking imaging equipment directly to EHR systems speeds up how fast staff can grab patient information. This connection helps doctors diagnose faster and patients spend less time waiting around.
Conclusion
A smart imaging room layout really shapes the kind of care patients get. When mixing safety, good equipment placement, comfort, and up-to-date technology, the whole place just works better. It keeps things moving smoothly, helps staff do their jobs faster, and cuts down on risks. Plus, patients feel the difference — things just feel better. Putting effort into a design that puts people first always pays off. It makes the imaging department stronger, more effective, and just plain better for everyone.
Building a smooth imaging department needs many things in place: safety, equipment placement, patient comfort, and technology. All of these things have to work together. While the whole process is challenging, it can be streamlined through a one-stop imaging solution. Companies such as MeCanMed offer one-stop solutions, handling everything from initial layout planning and equipment procurement to final installation and maintenance. This end-to-end approach helps to ensure that the resulting imaging environment meets safety requirements, runs smoothly, and stays reliable.